SLI Ready Extreme Gaming PC's

Thursday, January 8, 2009

How to convert .flv (flash video) to .avi or .mpg

Some sites have flash video’s online that play in your browser, if you have the correct plugins.
Thanks to Veblin, I learned that these video’s are stored on your HD (most likely the Temp Internet Files), and that they (sometimes) have the .flv (FLash Video) extension.

The .flv files play fine in the latest VLC player (v 0.81) .

I wanted to try to convert to avi or mpg and could not find a guide on videohelp, so I did some research of my own. This is a way, it worked for me, and I would like to share it with you.

I use the RivaFLVencoder; http://www.rivavx.com/index.php?encoder&L=3
which is freeware and it’s based on the FFMPEG encoder (normally it is used to create .flv files from .avi or .mpg, but it can do the reverse too). There is also FlixPro by Wildform, but that costs about $150.

Download, install and open Riva.


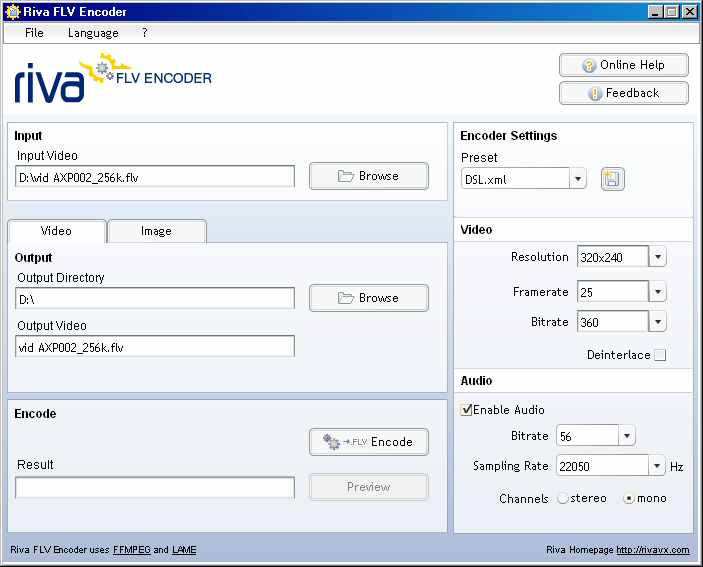
Click the Browse button in the Input tab and locate the .flv file you want to convert.

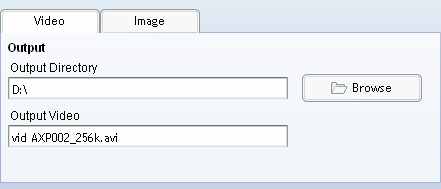
Click the Browse button in the Output tab to select the location to save your output.

The default outputname will have the extension .flv (after all it is an FLV encoder) but just click it and change the extension to .avi or .mpg


Then adjust the encoding parameters for both video and audio to your liking


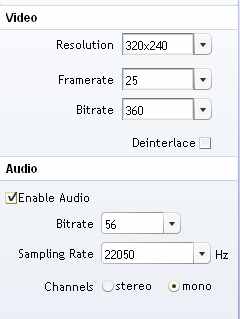
Make sure you check the box Enable Audio or you’ll end up with a mute video!!!!

It’s possible that the .flv contains an audiocodec that will not be transcoded. A solution for that is to play the original .flv and record the audio with Audacity (for instance) and to mux that recording with the .avi or .mpg you get from Riva.

Just experiment with the settings, but don’t expect miracles.

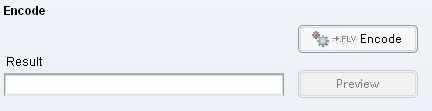
With the correct settings, you can now hit the Encode button


The FFMPEG window will popup


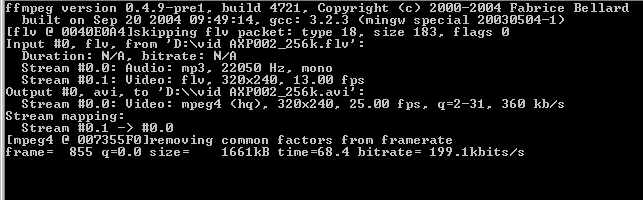
When FFMPEG is done with the encoding, this window will close and (hopefully) you have an .avi or .mpg.

The .avi is compressed with FFMPEG’s divx codec, as far as I know.

Again, this is only a way of converting that I tried and it worked for me.
It might be possible to use only FFMPEG, but I’m not familiar with it’s commandline, so I’m gratefull for the GUI of Riva. Someone out there might have a much better solution, so feel free to comment. :)

Monday, October 20, 2008

Rapid share tweaks

Rapidshare traces the users IP address to limit each user to a certain amount of downloading per day. To get around this, you need to show the rapidshare server a different IP address.
Here are some methods for doing this:
1. Short-Out the JavaScript:
1. Goto the page you want to download
2. Select FREE button
3. In the address bar put the following: javascript:alert(c=0)
4. Click OK
5. Click OK to the pop-up box
6. Enter the captcha
7. Download Your File

2. Request a new IP address from your ISP server.
Here's how to do it in windows:
1. Click Start
2. Click run
3. In the run box type cmd.exe and click OK
4. When the command prompt opens type the following. ENTER after each new line.
ipconfig /flushdns
ipconfig /release
ipconfig /renew
exit
5. Erase your cookies in whatever browser you are using.
6. Try the rapidshare download again.


Frequently you will be assigned a new IP address when this happens. Sometime you will, sometimes you will not. If you are on a fixed IP address, this method will not work. To be honest, I do not know how to do this in linux/unix/etc. If this works for you, you may want to save the above commands into a batch file, and just run it when you need it.

3. Use a proxy with SwitchProxy and Firefox:
1. Download and install Firefox if you have not already
2. Download and install SwitchProxy
3. Google for free proxies
4. When you hit your download limit, clean your cookies and change your proxy

Tips to recover scratched CD's

Don't you feel like crying every time you add another disc to your pile of scratched discs. Trashing that disc which contained your favorite songs, pics, files, games or videos is not easy.
Read-on, if you find yourself wishing for a miracle every time your fav CD is scratched:

Home Remedy :
here's an easy home remedy, which might give you the desired results. Rub a small amount of toothpaste on the scratch and polish the CD with a soft cloth and any petroleum-based polishing solution (like clear shoe polish). Squirt a drop of Brasso and wipe it with a clean cloth.

Technology to the rescue
There are many softwares available on the net, which enable the recovery of the CD data. BadCopy Pro is one such software, which can be used to recover destroyed data and files from a range of media.
Just a few clicks is all it requires to recover the disc from almost all kind of damage situation; be it corrupted, lost data, unreadable or defective.

DiskDoctors is another popular company, which offers both software and solutions to recover data from a scratched CDs and DVDs.

General Tips:
* Always wipe the CD from the center outward with stratight spoke-like strokes. Wiping CDs in circles will create more scratches.

* Do not scratch the graphics layer as you cannot repair the disc.
HINT: Hold the disc up to a light with the graphics layer facing the light source. If you can see light thru the scratches at any point then the disc may be irreparable and or exhibit loading or playing errors.

* Clean your Disc players lens regularly with a suitable product to ensure optimal viewing pleasure.

* Make sure to use a soft, lint-free cloth to clean both sides of the disc. Wipe in a straight line from the center of the disc to the outer edge.

* If wiping with a cloth does not remove a fingerprint or smudge, use a specialized DVD disc polishing spray to clean the disc.

* Only handle the disc by its outer edge and the empty hole in the middle.

FOR BEGGINERS....

FEW WINDOWS SHORTCUTS........

Windows: Display the Start menu
Windows + D: Minimize or restore all windows
Windows + E: Display Windows Explorer
Windows + F: Display Search for files
Windows + Ctrl + F: Display Search for computer
Windows + F1: Display Help and Support Center
Windows + R: Display Run dialog box
Windows + break: Display System Properties dialog box
Windows + shift + M: Undo minimize all windows
Windows + L: Lock the workstation
Windows + U: Open Utility Manager
Windows + Q: Quick switching of users (Powertoys only)
Windows + Q: Hold Windows Key, then tap Q to scroll thru the different users on your PC

Hide the Text Below Desktop Icons

Some icons you use so regularly that you don’t need that annoying text below the icon. A good example of this is Internet Explorer or Mozilla Firefox. We all know what those icons look like. To remove that text, just follow these instructions.

Right-click on the shortcut icon, and choose Rename. Now hold down the Alt key and type in 255 on the keypad to the right of the keyboard. You can’t use the number keys right above the keyboard. If you have a laptop, you can turn on Numlock and then use the little number keys next to the regular letters.

The way this works is that the Alt+255 character is blank, so the shortcut filename is actually just named with a character that is completely blank. For the first shortcut on the desktop, you would use Alt+255, but for the next shortcut, you’ll have to enter the combination twice (Alt+255, Alt+255). For the third, three times… and so on. This is because you can’t name two different shortcuts or files the same thing. Entering Alt+225 twice would give you two blanks instead of one.

Now we have a beautiful icon, with no text underneath it!

Remove Time Restriction from Rapidshare FREE Download

Downloading from RAPIDSHARE often becomes a headache due to the time delay for FREE downloaders!!!
Do as follows :
———————————————————–
>> Click a Download link for Rapidshare !
>> Click the Free button on Rapidshare Page !
>> Now as usual the timer starts !!!
>> Now, go to the address box of your browser.
(Address Box >> Where you type the websites !)
>> In the address box type: javascript:alert(c=0)
>> Click OK on the alert box that arises.
>> NO WAITING.........ENJOY......

Change the Default Directory of Software Installation

You may want to change the location of your system default folder (C:\Program Files) from C drive to another system drives (D or E drive). By default software setup will attempt to install program in C:\Program Files directory. It is good practice to make the backup of the installed programs, if you installed all your programs in other than C drive. If you have little knowledge about editing windows registry then you can configure your computer for this purpose.
Follow the given steps to configure windows registry:

1. Click on Start button then type Regedit in Run option.
2. Here navigate to: HKEY_LOCAL_MACHINE\SOFTWARE\Microsoft\Windows\CurrentVersion
3. In right side panel, double click on ProgramFileDir.
4. Now modify the value to any other drive (for example D:\Program Files).
Now close the registry editor and restart your computer after any changes to go into effect.

Use Notepad as a Diary

Want to write your diary on your computer? You can do it without using any software.
1. Open Notepad
2. Type “.LOG”
3. Save it
4. Now every time you open this file notepad will automatically insert date and time to the last line of the file.
You can type anything after that line and save it. In this way you can use it as a diary.

Use Notepad As a Diary

Want to write your diary on your computer? You can do it without using any software.
1. Open Notepad
2. Type “.LOG”
3. Save it
4. Now every time you open this file notepad will automatically insert date and time to the last line of the file.
You can type anything after that line and save it. In this way you can use it as a diary.

Prevent Users From Writing to USB

If you have windows XP with SP2, then you can disable the writing option to USB drives. This trick is very useful if you have virus in your computer and want to copy files from a USB Drive but don’t want to transfer virus to the USB. Follow the given steps to disable the USB writing option:
To edit the computer registry, first you should log onto your computer with administrative rights.
First click on Start button and type “Regedit” in Run option.
Here locate the location to:
HKEY_LOCAL_MACHINE\SYSTEM\CurrentControlSet\Control
Here in right side panel, click right to create a key with the name “StorageDevicePolicies”.
Now in left side panel, select “StorageDevicePolicies” key, again right click to create new DWORD value then label it “WriteProtect”. Set its value to “1″. But again to enable writing, set its values to “0″.
Now close the registry editor and restart your computer after any changes to go into effect.